
 By
By 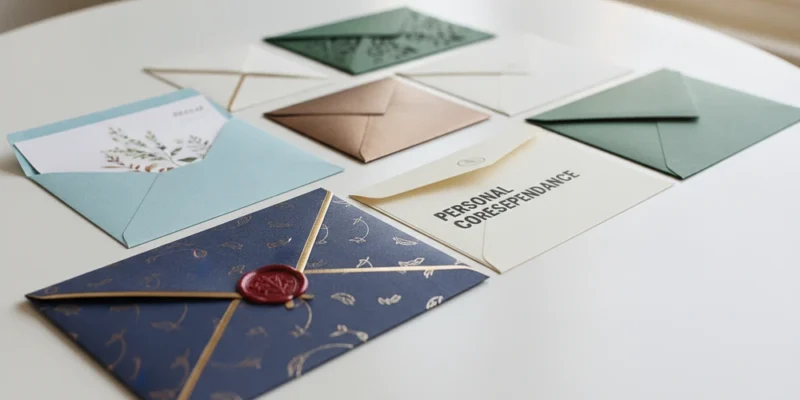
Tag – Custom Envelopes
Custom envelopes are more than just a cover for a letter. In the United States, they are made to fit a brand and a mailing goal. The right choice can make your mail feel clear, trusted, and worth opening.
This guide is for real-world mailrooms and busy teams. You’ll learn from planning to mailing details. You’ll see how branded envelopes can keep your look consistent without slowing you down.
By the end, you’ll know how to pick the right envelope sizes and prepare files. You’ll also learn about digital and offset printing, inks, and finishes. This ensures your envelopes arrive looking professional and scan well.
Envelopes are often the first thing people see from your company. They can shape trust and open rates. Most decisions are based on brand consistency, budget, and how fast you need them.
What Are Custom Envelopes and Why They Matter
Mail is often the first thing a customer sees. Custom envelopes make that moment special, not just routine. When the envelope looks good, the message inside feels more confident.
A smart envelope also keeps important details safe. You can match the envelope to its purpose. This keeps the mail looking neat and reduces the “bulk mail” look that people ignore.
How custom envelopes support branding and credibility
Branding works best when it’s consistent. Logo envelopes make your mark easy to spot. They reinforce your colors and type, making your mail feel expected.
Trust comes from clarity. Return address envelopes look official and easy to verify. Quality paper and sharp print edges show you care, making recipients more likely to open and read.
Placement choices can do more than decorate. Teams often print logos and return info on the front. They add a short line on the back flap and use inside patterns for privacy. These details turn basic mail into professional materials that feel planned and secure.
Common use cases in the United States: business mail, events, invoices, and direct mail
In the United States, envelopes carry important messages. Offices use them for statements, HR notices, legal letters, and donor receipts. Nonprofits rely on them for trustworthy acknowledgments.
Events need a polished first impression. Weddings, galas, corporate invites, and trade show mailers benefit from matching sizes and formal stocks. Custom envelopes help keep the invitation suite neat and easy to handle.
Marketing is another major use. Direct mail offers, membership renewals, political mail, and fundraising appeals perform better with credible outer pieces. E-commerce brands use small inserts and gift notes that pair well with custom envelopes for a consistent unboxing feel.
Key elements that make an envelope “custom” (size, paper, print, and finishing)
“Custom” starts with fit. Common formats include #10 for business letters, A7 for invitations, and 9×12 for documents that shouldn’t be folded. Square styles can stand out, but they may affect postage and sorting.
Paper choice changes the feel right away. Bright white uncoated stocks read clean, while textured or recycled sheets add warmth and tone. Opacity matters for privacy, especially when you mail invoices, checks, or account updates.
Printing and finishing add the final layer. Options range from one-color to full-color, front-only to flap and interior printing, plus security tints. Windows, peel-and-seal closures, and premium touches like foil or embossing can make logo envelopes and return address envelopes look like true professional mailing materials.
| Custom choice | Typical U.S. use | What it signals | Practical watch-outs |
|---|---|---|---|
| #10, standard business format | Statements, notices, everyday correspondence | Familiar and official | Keep address area clear for automation and clean scanning |
| A7, invitation format | Weddings, galas, corporate invitations | Formal and curated | Match insert size and consider thicker stocks for clean feeding |
| 9×12, flat mail | Contracts, reports, certificates | Important documents, handled with care | Higher postage is common; choose sturdy paper to prevent bends |
| Window and inside tint options | Invoices, billing, account mail | Organized and privacy-aware | Align window placement to the form; confirm ink doesn’t show through |
Custom Envelopes Design Essentials for Professional Mail
Creating strong Custom envelopes starts with knowing your mailing goal. For example, an invoice needs quick scanning and clear data lines. On the other hand, an invitation might focus on paper feel and color.
Marketing mail requires space for a message but must also pass through automated sorting smoothly. Once you know your purpose, choose the right size and design your envelope layout. This layout should consider how it will be filled, sealed, and mailed.
Standard sizes are easier to find and use with equipment. But, nonstandard sizes might increase postage or slow down production. A good design also makes sure important parts are visible, especially around flap folds and seams.
The return address should list the company name first, followed by street and suite, then city, state, and ZIP. Place it in the upper-left corner, making the company name stand out more. Logos should be clear at arm’s length and avoid thin strokes that can blur on uncoated stocks.
Put the recipient address block where machines expect it, with enough space and contrast. Use simple fonts, avoid very light weights, and make sure the address is large enough to read quickly. Plan your colors early to keep your brand consistent, as uncoated papers can change ink appearance.
When using window envelope templates, align the address block to the window and add a buffer on all sides. Inserts can move, so avoid placing important text near window edges. Also, keep QR codes, attention lines, and “Invoice Enclosed” cues away from barcode clear zones.
For file setup, start with printer-provided dielines and keep guides on a non-printing layer. Set the document size to the exact finished piece and use vector logos for sharper edges. When exporting, check that the print-ready envelope artwork matches the dieline, includes safe margins, and keeps text away from folds and seams.
| Design focus | Practical standard | Why it helps in the U.S. mail stream | Common pitfall to avoid |
|---|---|---|---|
| Mailing purpose | Define invoice, invitation, or marketing goal before designing | Keeps content, hierarchy, and placement aligned with handling and timing | Designing first, then forcing copy and postal needs to fit later |
| Return address hierarchy | Company name, street/suite, city/state/ZIP with clear spacing | Improves recognition and reduces misreads during processing | Over-stylized type or tight leading that blurs small characters |
| Recipient address block | High-contrast type, clean font, stable placement within the main address area | Supports automated sorting and faster delivery | Placing text too low, too close to edges, or crowding the block |
| Window alignment | Use window envelope templates and add tolerance for insert movement | Prevents clipped addresses and reduces undeliverable mail | Letting key lines sit near the window edge where shifts can cut them off |
| Artwork setup | Use dielines on a non-printing layer; build final envelope layout to exact size | Reduces production errors and speeds approvals | Flattening guides into the design or exporting the wrong document size |
Printing Options and Production Tips for Custom Envelopes
Choosing the right production method is key. The type of printing, ink, and finishing affect cost, time, and how the envelope looks. The best options also ensure readability and smooth processing.
Print methods: digital vs. offset and when to choose each
When deciding between digital and offset printing, consider quantity and speed. Digital printing is great for small orders, quick turnaround, and personalized items. It’s also easy for small batches.
Offset printing is better for large orders. It offers consistent color and lower cost per piece. It also supports specialty inks and detailed coverage.
| Decision point | Digital printing | Offset printing |
|---|---|---|
| Best order size | Low to mid quantities with frequent reorders | High quantities where unit cost drops with volume |
| Turnaround | Often faster for standard jobs and quick changes | Usually longer due to plates and press setup |
| Personalization | Strong for variable data like names and unique QR codes | Limited without added workflow steps |
| Color control | Good, but can shift by paper and device calibration | Very strong, especially with spot color matching |
Ink choices and effects: PMS spot colors, CMYK, and black-only runs
PMS spot colors are perfect for maintaining brand colors. They’re common for logos that need to match other printed materials. CMYK is better for photos and gradients, but results can vary.
Black-only runs are cost-effective for statements and invoices. Make sure the printer uses rich black for heavy coverage. These details ensure reliable printing without surprises.
Finishing options: embossing, foil stamping, and UV spot treatments
Finishes add feel and focus, but they add steps. Embossing raises a logo or seal and works well on heavier stocks. Foil stamping adds a sharp look for invitations, but contrast is key for readability.
UV spot treatments highlight a mark or pattern with gloss. Keep the layout simple to let the shine enhance the design. A single, well-placed effect can look more upscale than too many.
Addressing and compliance: window placement, USPS considerations, and barcode clear zones
Addresses can be printed or applied by label. Placement must be consistent for automation. Window placement should match the insert’s address block, with some tolerance for folding.
USPS mailing compliance requires clear zones. Leave space for barcodes, keep artwork away from sorting equipment, and avoid heavy ink in scanning zones. These choices help envelopes move smoothly through processing.
Proofing checklist: bleed, safe margins, dielines, and color proof approvals
- Confirm the dieline and orientation, including flap direction, seams, and any window cut location.
- Check safe margins so logos and text don’t sit too close to edges, folds, or windows.
- Verify bleed rules only where the envelope style allows it, and confirm how edges and flaps will print.
- Review color proofs: approve PMS callouts when needed, and request a hard proof if color matching is critical.
- Preflight files: outline or embed fonts, confirm image resolution, export a print-ready PDF, and remove non-print layers unless the printer requests dielines.
Conclusion
Custom envelopes do more than carry a letter. They set the tone when mail arrives. The right choices build trust, boost response rates, and support brand consistency in mail.
The process is simple if you follow a clear order. Start with purpose, then choose a size and format. Use #10 for letters, A7 for invites, or 9×12 for flat inserts.
Design for fast reading with clean type and strong contrast. Then, choose professional envelope printing that matches your brand.
For custom envelope ordering, keep a short checklist. Choose between window or non-window envelopes. Gather logo files and approved fonts.
Confirm if you need PMS spot colors or CMYK. Ask your printer for templates and dielines. Build print-ready art and decide between digital or offset printing based on quantity and color needs.
Before production, check USPS-friendly placement for addresses and windows. Then, approve proofs for layout and color. This ensures the final run stays on schedule. Done right, Custom envelopes bring polished presentation and consistent identity to every send.








Comments